Hello world!
Today we’re taking a break from our usual reviews for a quick tutorial! This is my first time writing a tutorial, so please let me know if there are any questions or things I could explain to make this more helpful!
Your neighborhood VP modifier,
Katherine
To start with — you pick a pen to modify.
I chose to use a Pilot Vanishing Point. I did this for three reasons — 1. they’re easy to find lightly used, though not terribly cheap (I paid $37 for one with no nib, and $60 for the other, with a nib), 2. the cylindrical shape makes it easier to get an even finish. I don’t have to worry about the curved end of most pens and, 3. the clip is removable — it’s really hard to get UNDER a clip to sand and buff if you can’t remove it. (I guess you could hope no one notices your imperfect finish around the clip, but meh)
Next — remove the clip. If you chose to go with a Vanishing Point, I found Richard Binder’s tutorial here quite helpful. I used a piece of bike inner tube and a normal pair of pliers (I’m a cheapskate who doesn’t own section pliers) to wiggle the clip off.
If you chose to use a VP, you’ll now have the rubber trapdoor exposed — I found it helpful to wrap that in a cylinder of masking tape. This means that you can hold the area and not worry about damaging the trapdoor. During my first modification, I did push the wire that holds the trapdoor in out at some point… and spent 20 minutes squinting with a pair of tweezers to get it back in. Avoid that.
And, before you start, find a way that you can dry your pen so that none of the wet parts of the finish will touch anything. For the VPs, if you find a perfect sized box, it can be balanced on the clicky part and the masking tape cone. For other pens, you may need to take a box, stick some holes in it and have chopsticks hold up the pieces. (Assuming they have closed ends)
 (bottom left is abalone shell, top right is glitter nail polish)
Now for the fun part — your new finish! You have a couple of options:
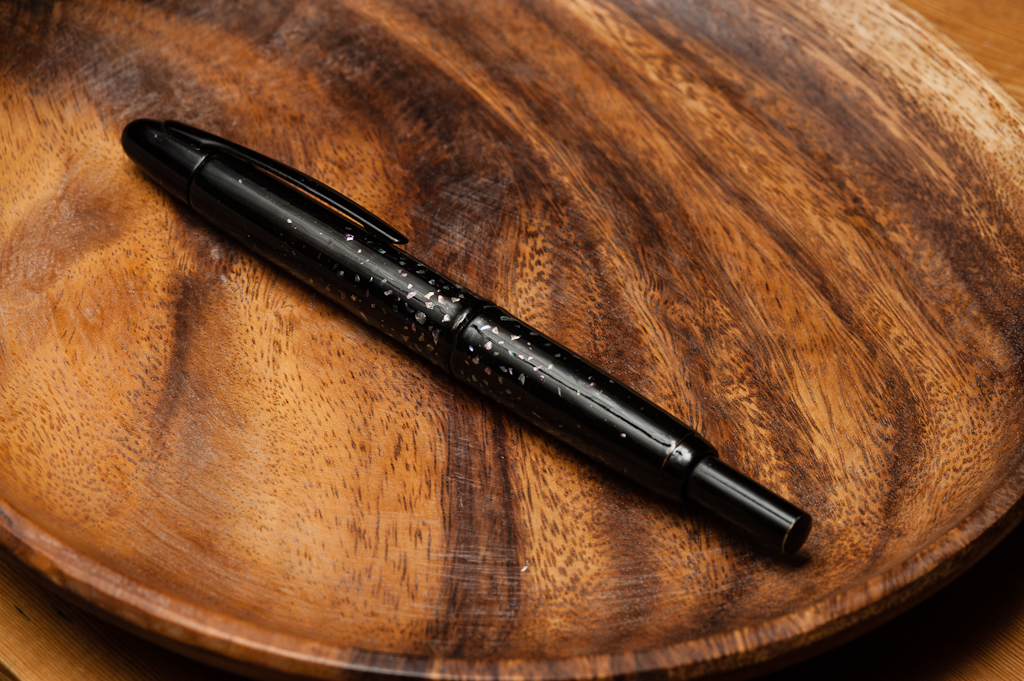
- Glitter nail polish (I used Revlon’s discontinued Moon Candy glitter flakes. I went for something with iridescent but not opaque flakes that came in irregular sizes. I’d love suggestions for other options!) Lots of pictures of this finish are in our Decimo review.
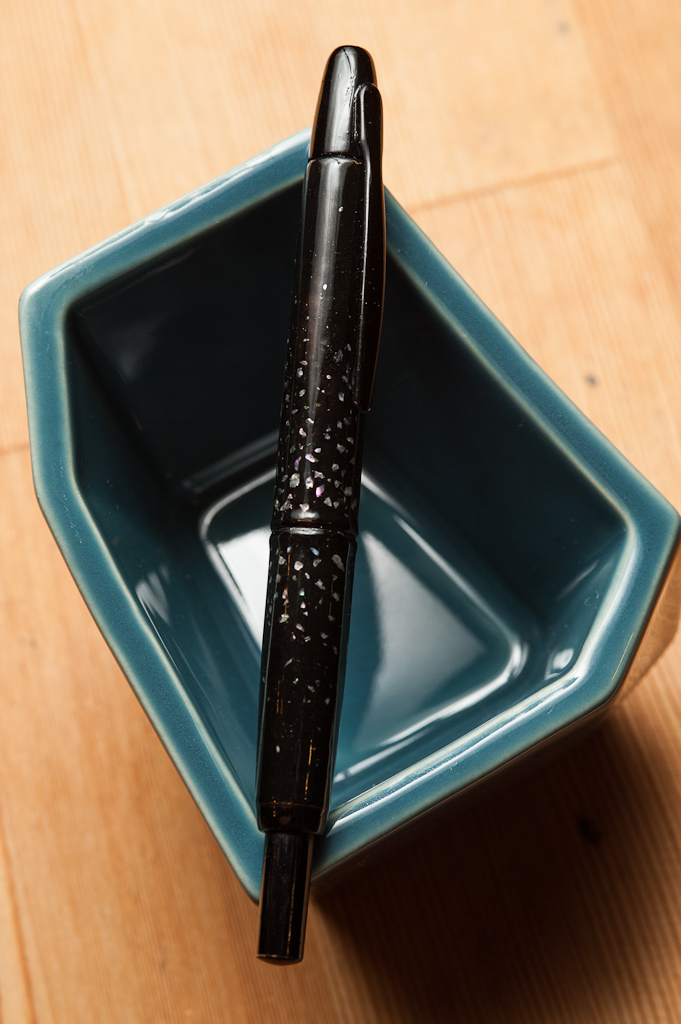
- Abalone shell (like actual raden!) — I suspect you could use any number of other types of shell that contain nacre, but I don’t know how well they flake, so it’s up to you to try. Oysters and certain mussels are apparently the common sources for mother of pearl. I’m a weirdo who ate a bunch of abalones a few months ago and kept the shells, so I used abalone shell.
- Something else — if you do a bunch of Googling and eBaying, you can buy pre-cut mother of pearl sheets that may be actual MOP (nacre) or mica, depending on what you buy. This tutorial should work with either.
 (some of the dust from my abalone shell as I flaked it with a dremel… then you get to pick through it with tweezers for the bigger pieces)
How to flake abalone (ymmv with other types of shell, but I suspect it’ll be similar) — I found it easiest to work with a dremel and dremel off pieces of the shell, bit by bit, sometimes straight down, sometimes at an angle. Then, when you have a decent pile of abalone-shell dust (most of it will be dust), pick through the pile with tweezers and put them on a piece of black paper (in my case I used a dark grey plastic dinner plate). You want to separate out as much dust as possible, since you don’t want the dust on your pen. If you don’t have a dremel, you can probabbbbly hammer it into small pieces and pick through the fragments. (I haven’t tried it, but it seems like it should work!)
EDIT: Make sure you wear a respirator while doing this! Otherwise you’re breathing in a lot of icky dust and abalone powder.
And other supplies you’ll want:
- Micromesh (I used a lot of 2000 grit sandpaper, but having some variety will help you achieve exactly the look you want)
- Tiny brushes (I stole the brushes out of my mom’s Latisse kits, but any small brushes that don’t shed bristles should be good)
- Polyurethane and/or Polyacylic (both in gloss finishes)
- (optional) Acrylic paint
A quick note on polyacrylic vs polyurethane — polyacrylic is what I initially used for both pens, it’s easy to work with — washes out of brushes with soap and water and sands and buffs quickly. However, it’s not a very hard finish. This is fine on a matte finish pen, since small dings and scratches don’t stand out. However, if you want a high-gloss, glass-like finish, you have to work with polyurethane. It smells worse, is hard to wash out, harder to sand… but is much harder (even then, it’s not as hard as urushi or many other pen finishes, I’m still working on figuring out what my other options are). Also, polyacrylic dries clear, and polyurethane has an “amber” tone — so if you’re layering over a very blue finish, it could look weird.
I found that acrylic paint mixes into polyacrylic fairly well and gives it a nice tint — I used this to hide the blemishes in the base finish of the matte black VP I started with for the abalone-finish pen. This isn’t necessary, but I imagine some cool layering could be done.
Once you have everything… (some general instructions)
- Do a quick layer of sanding on the original finish. I used 800 grit sand paper and just did a quick pass.
- Apply the first layer of the finish (more on this below)
- Apply the second layer of the finish
- Apply the first layer of clear polyacrylic/urethane and let it dry for 6-12 hours minimum. I know the can says it’s dry in 2 hours or something, but it’s probably a lie.
- Sand lightly
- Apply another layer of poly
- Sand lightly — does the finish still feel very bumpy? If so, repeat layering and sanding until it’s reasonably smooth, then:
- Buff using successively higher grits of micromesh to get a mirror-like shine or be lazy and get lucky with a layer of polyurethane being smooth and glossy
- And you’re done!
How to apply the glitter finish:
I used two different “colors” of glitter, one that spanned most of the body (a mostly purple/blue glitter) and a multicolor one that I focused on the middle of the pen, to give it that “gradient” look. I did a layer of the purple glitter first, let it dry, then did the second multicolor layer. Then I let both layers dry and de-gas for a day. I’m not sure if such a long drying period is necessary, but something I read on the internet (and the internet never lies) said that drying nail polish releases gasses, and you want all of that gone before you seal it further. Seems plausible. After those two layers dry, you can start step 4 above. (I think it took me three “top” coats to get the pen more or less smooth)
How to apply a “raden” or abalone-flake finish: (Even getting flakes aside, this one is much more involved)
I first did two layers of tinted polyacrylic to cover up the wear in the finish. That’s totally optional, but gave me a very even base to work with. Then, I used a small brush and painted on a very small thin patch of tinted (you could use clear) poly, then placed flakes one by one using my damp finger and tweezers. You really want just flakes on a dark surface, ideally roughly sorted by size. If you go for the gradient look, you’ll want the larger flakes toward the middle and the thin layer of poly stops being tacky enough to hold a flake in a couple minutes, so work in small areas. I found that my damp fingertip was easier to get the flake on where I wanted it, then if necessary, tweezers could push the flake around. I finished the entire pen (patch by patch) in about an hour of lots of squinting with a bright table lamp. From here, you can go to step 4 above. (I think it took me 4-6 layers to get it smooth)
Tada! You’re done. Let the pen dry for a couple days (unless you’ve actually been spacing out each layer and letting things dry reallly well), reattach your clip (I used a smidge of sac shellac) and enjoy!
5 Comments
This is AMAZING! I’m not sure I’d be brave enough to try this first with a VP, but maybe a cheaper pen…hmm. The nailpolish one I wouldn’t have guessed was nailpolish!
Loving this blog.
Do you take customers? I would love to do this to my pen (even the one with the glitter nail polish looks amazing), but I am too nervous to attempt it myself!
Sorry, just saw this! I do not, sorry.
This article is EXACTLY what I was looking for. I want to try this as I am obsessed with Raden pens but only have a couple as they are so expensive. One question. Why did you not use shellac like the the traditional Maki-e pen makers use?
hi! shellac is traditionally used to close up barrels and attach sacs, but not for the lacquer. the traditional Japanese lacquer is urushi — which isn’t the easiest to work with (only cures at certain temperatures and humidities and has the same reaction-causing component as poison oak) so I opted for safer more DIY friendly substitutes.